Friday, July 29, 2011

Heroes on a Budget: Liquid Hate

The original Heroes on a Budget project from November 2010.
Created by Grey Man and myself last year from a modified recipe I got from Amazonia.

LEGALITY: Probably pretty shaky. Then again if we're looking at home-made modified stun gun boots, why not a little home-made pepper spray.

It's been tested by Urban Avenger:
"I tweeted a lot about the tests and while they are not as extensive as I would like (my face still burns from ambient exposure to both products) I have to conclude that LH is an excellent alternative to PS. Am I saying don't carry PS if you don't have to? Certainly not. But if you really can't afford it or for some reason burn through the stuff, LH is handy. I would only recommend a different delivery system. My pepper spray shoots a stream, as opposed to a mist, which makes it easier to aim and is more concentrated. However in a small squirt gun (which I picked one up the other day) LH would make an awesome self defense tool. I believe this stuff could also be put into paintball grenades or water balloons for alternative forms of use. I may and actually try and improve upon the formula. They use jalapenos and cayenne peppers distilled in rubbing alcohol. I'd like to take habaneros and other hotter peppers and distill them in vinegar. I bought the stuff a while back but have misplaced the stuff.
Ultimately, I give liquid hate the urban avenger seal of approval."

It's been called 'bug juice' by Silver Sentinel:
"We better keep an eye on Grey and Midnite.. these two are a Darwin Award just waiting to happen."

And it burns like a motherf@cker when it hits your eyes and mucus membranes.

Here's how to make it.....

Quoting Grey Man:
"Ingredients:
2 small glass jars with lids
1 bottle rubbing alcohol (70% or more)
12 dried jalapenos
handful dried red chilies (cayenne)
cone style coffee filters

Roughly crush 6 jalapenos and ½ the chilies and place in 1 canning jar, add ½ the bottle of rubbing alcohol.
Close the jar tightly and let sit 2 days to a week. Place a coffee filter into the second jar and slowly filter the liquid into the second jar and lid it tightly. BE CAREFUL TO NOT GET ANY ON YOUR SKIN!

I recommend DOUBLE BAGGING the left-over solid portion of this “brew” when you throw it away, seriously!
Repeat this process for the second half of the ingredients. Lid the resulting liquid tightly, and place the jar in a sunny window for a week or two. Again I say: BE CAREFUL TO NOT GET ANY ON YOUR SKIN!

This stuff is very close to store bought pepper spray, which means its next to toxic, seriously be careful when dealing with it!"

The stuff got even stronger when it sat around for two weeks.
When sprayed and walked through after a few seconds of hanging in the air it will make your nose run, choke you, and cause you to tear up badly.

A few minutes ago, after I wrote the above, I took a spray and walk through. The damn stuff still as mean as ever. I got small particles in my throat and got to choke, snot, and wheeze for a number of minutes. Ornery. It was created back in November 2010 and here, July 2011, seven months later, it still burns like fire. We store it in a canning jar. It has a good shelf life apparently.

It's cheap, easy, and works. It has it's flaws but it can be useful if you've got nothing better.
Try it out. It's worth a shot.

We originally used small finger pump bottles (such as perfume or little body mist bottles), self priming, easily concealed and brought into play to deliver it to a target.


I've started using a simple vial with a flick off top to throw directly in the targets face if the need arises.

We're working on other ways to cause mayhem with it, including my idea of filling an inexpensive refillable aerosol can with it and turning it looks to fill a room with a mist. That would be insanely horrible to be in the middle of. Useful? Probably not but it's a thought. I've also considered mixing it in with shaving cream in the aerosol can to create a Liquid Hate foam splatter. It might be psychologically more effective if delivered this way and the foam will be very hard to wipe off completely without spreading the Liquid Hate around.


Waterguns and other pressurized sprayers/toys/etc were tossed around by myself and various individuals. I've also considered the rubber tube "Paintball grenade" idea.

Remember: use responsibly.

If you can afford legit Pepper Spray THEN GET SOME. If not, this is an alternative. Use it safe, use it smart, and for God's sake don't use it on someone who didn't need it.

Heroes on a Budget: Bracers

Heroes on a Budget

This is going to be a series of projects utilizing what I can scrounge and afford with minimum cost to work up viable equipment for those of us who cannot fund better equipment at this point in our activities.

Bracers.
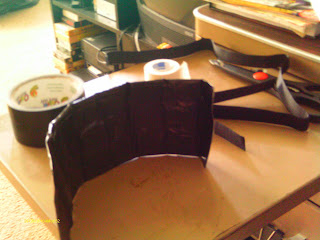
I decided that I wanted to build some bracers to protect my wrists and lower forearm from slashing and stab attacks and decided on a brigandine armor approach. Then I decided to use what I could find at work (Walmart). This is what I came up with after some deliberation and browsing on work breaks.

What I bought:
20 1/4" metal washers. 4 packets of five at .97 cents each so 5 bucks.

Athletic tape. About 7 bucks for three rolls, and I barely used half a roll on one bracer so that's about three sets worth. Not bad.

A yard of velcro. .97 cents again.

What I had:
Duct tape. I had black.
Scissors.


It took me roughly forty minutes for this first prototype.

First I decided the width I had wanted was about four or five inches so I laid three washers together, slightly overlapping on a strip of tape. Then tape up the otherside.


Repeat however many times you need to wrap around your wrist/arm..

Lay side by side and tape the Hell out of them to a nice thick packet. I kept mine fairly thing but could have added much more. (This is also the point I would add in padding.)


Cover the whole thing with duct tape of choice.


Cut your velcro and tape three strips to the packet very, very tightly. I did three strips, one on each end and middle, to leave plenty of room for the opposite piece of velcro to attach.


I will be adding in some padding such as leather or camp foam (covered in more duct tape) to help blunt the sting of blows and I believe they will stand up to a solid hit.

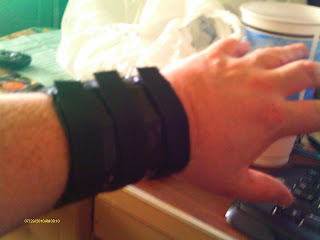
Secure tightly with more duct tape and voila, straps on nice and tight. I protects everything but a one inch strip of just tape on the bottom of my wrist. I'll cover this with taped leather or padding later to protect from slashes.


I pounded them on the corner of the wall and they protected very well. I then hammered it with Grey Man's bokken and it stung like Hell, but nothing would be broken. DEFINITELY padding. Finally I stabbed as hard as I could with a sharp pointed paring knife (I count fourteen stab holes) while it lay on the kitchen counter and it did not penetrate the thing. The holes in the washers are obvious weak spots, but the tape made up for it and a leather lining would be even better. These were solid hits on a counter. If stabbed in the field, your arm would be pushed down by the force of the blow, instead of stationary like on the kitchen counter, helping to deflect the stab even better. No doubt solid metal plates would be better, and I will work up a second pair with this in mind in the future.

Fourteen knife marks from the stabbings.


Not a mark on the inside where your arm is.


They are not indestructible, but they are sturdy and I believe they will be reliable.
They are easily and cheaply repaired if they are involved in an incident. If they are slashed, the copious amounts of tape will keep the metal washers stuck right where they are at. If you spend a bit more money you can build one up to your elbow if you wish.

Of course if some more money comes in I would get a better set. But until you can afford them, these should help out, providing some protection to the forearms and wrists from slashing attacks where you will be most likely to block with your arms out of sheer instinct. You could buy a set of those shin guards I see everyone wearing. Mine cover more arm area than the guards, they leave the under arm exposed to damage, although the guards are better padded. Perhaps a combination of the two with this method protecting the underarm which is a prime slashing target and the harder padding on top to deflect blows.

The weight on them is very light as well. Pretty much negligible.

And they don't look bad for a forty minute rush job with minimal materials. :)

I wonder how much it would cost to build a stab resistant vest this way. :D


Thursday, July 28, 2011

How the Other Side Fights: Fighting from a Skinhead Perspective

I ran across this a few years ago and, edited out the racial slurs and the disgusting treatment in the 'post fight' section as it does
encapsulates the old school WWII combatives style of training and
fighting that I focus on, and saved it for a focus training manual.

I just ran into it again on this blog while doing some research.
It shows how nasty some of the people we can run into on the street can be and the mentality of a real maim or kill you fight, not a club fight or some kids
wrestle/punching for their friends.

AGAIN, I must warn there is some racial language other unpleasantness, but that's how it is out there so suck it up and read it.
http://cosmodromium.blogspot.com/2008/05/how-to-fight-like-skinhead.html?zx=18d187b602444fdc

Knight Owl's RLSH-Manual

A while back the RLSH Knight Owl created an online manual with many topics a new/newer RLSH should know including handling police, self defense, first aid, and many other topics.

After getting KO's permission to share it in a convenient non-web form I pulled it onto a .rtf file and kindled it (it's a rough kindle with no links or booksmarks but is complete).http://www.blogger.com/img/blank.gif
This will make it easier to access and even print off when web access is a no go.

Read it, know it.

The RLSH-Manual Site.
My .rtf file of the manual.

Wednesday, July 20, 2011

Basic Homemade First Aid Kits

These little guys can be very handy when you're on the road or out getting into trouble. They are basic and will serve to help a great deal in giving first aid until the victim can be attended by professionals with better equipment. Tailor your own kit to your needs, and don't forget to wear a reliable watch with a seconds timer and carry a good small light.


Personal:
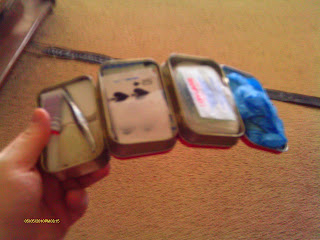
Three Altiods tins with rubber bands.
Scissors, small
First aid tape, wrapped around playing card.
Gauze wrap.
Several pair of disposable gloves
One tube of unopened superglue.
Alcohol swabs.
Variet of band aids.
Magnifier card.
Bag of neosporin.
Pill box, aspirin and Aleve (naproxin pain relief, NSAID)

Since the pics were taken I've added in a small bottle of Iodine and three zipped cell phone pouches to keep the tins organized in a bag or on a belt.


Larger:
This one supplements the smaller kit.

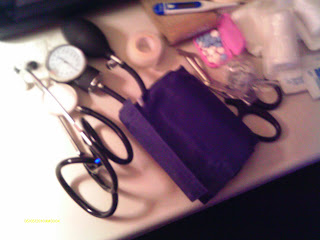
One netbook tote bag.
Bandage sheers.
More gauze wrap.
More first aid tape.
Trauma bandage.
Pressure bandage.
Gauze pads.
Trauma
Stethascope and blood pressure cuff.
Thermometer.
Large bottle of Iodine.

I've also added a small first aid guide to the larger kit.

In the summer I supplement it with a bottle of water and bug spray.