This is going to be a series of projects utilizing what I can scrounge and afford with minimum cost to work up viable equipment for those of us who cannot fund better equipment at this point in our activities.
Bracers.
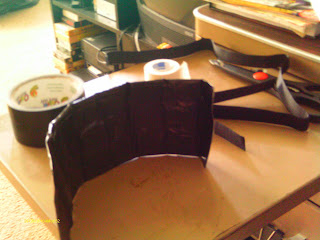
I decided that I wanted to build some bracers to protect my wrists and lower forearm from slashing and stab attacks and decided on a brigandine armor approach. Then I decided to use what I could find at work (Walmart). This is what I came up with after some deliberation and browsing on work breaks.
What I bought:
20 1/4" metal washers. 4 packets of five at .97 cents each so 5 bucks.
Athletic tape. About 7 bucks for three rolls, and I barely used half a roll on one bracer so that's about three sets worth. Not bad.
A yard of velcro. .97 cents again.
What I had:
Duct tape. I had black.
Scissors.

It took me roughly forty minutes for this first prototype.
First I decided the width I had wanted was about four or five inches so I laid three washers together, slightly overlapping on a strip of tape. Then tape up the otherside.

Repeat however many times you need to wrap around your wrist/arm..
Lay side by side and tape the Hell out of them to a nice thick packet. I kept mine fairly thing but could have added much more. (This is also the point I would add in padding.)


Cover the whole thing with duct tape of choice.


Cut your velcro and tape three strips to the packet very, very tightly. I did three strips, one on each end and middle, to leave plenty of room for the opposite piece of velcro to attach.


I will be adding in some padding such as leather or camp foam (covered in more duct tape) to help blunt the sting of blows and I believe they will stand up to a solid hit.
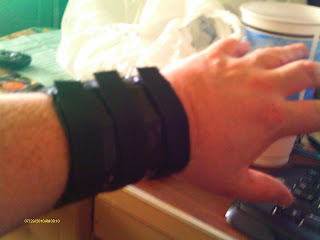
Secure tightly with more duct tape and voila, straps on nice and tight. I protects everything but a one inch strip of just tape on the bottom of my wrist. I'll cover this with taped leather or padding later to protect from slashes.


I pounded them on the corner of the wall and they protected very well. I then hammered it with Grey Man's bokken and it stung like Hell, but nothing would be broken. DEFINITELY padding. Finally I stabbed as hard as I could with a sharp pointed paring knife (I count fourteen stab holes) while it lay on the kitchen counter and it did not penetrate the thing. The holes in the washers are obvious weak spots, but the tape made up for it and a leather lining would be even better. These were solid hits on a counter. If stabbed in the field, your arm would be pushed down by the force of the blow, instead of stationary like on the kitchen counter, helping to deflect the stab even better. No doubt solid metal plates would be better, and I will work up a second pair with this in mind in the future.
Fourteen knife marks from the stabbings.


Not a mark on the inside where your arm is.

They are not indestructible, but they are sturdy and I believe they will be reliable.
They are easily and cheaply repaired if they are involved in an incident. If they are slashed, the copious amounts of tape will keep the metal washers stuck right where they are at. If you spend a bit more money you can build one up to your elbow if you wish.
Of course if some more money comes in I would get a better set. But until you can afford them, these should help out, providing some protection to the forearms and wrists from slashing attacks where you will be most likely to block with your arms out of sheer instinct. You could buy a set of those shin guards I see everyone wearing. Mine cover more arm area than the guards, they leave the under arm exposed to damage, although the guards are better padded. Perhaps a combination of the two with this method protecting the underarm which is a prime slashing target and the harder padding on top to deflect blows.
The weight on them is very light as well. Pretty much negligible.
And they don't look bad for a forty minute rush job with minimal materials. :)
I wonder how much it would cost to build a stab resistant vest this way. :D


No comments:
Post a Comment